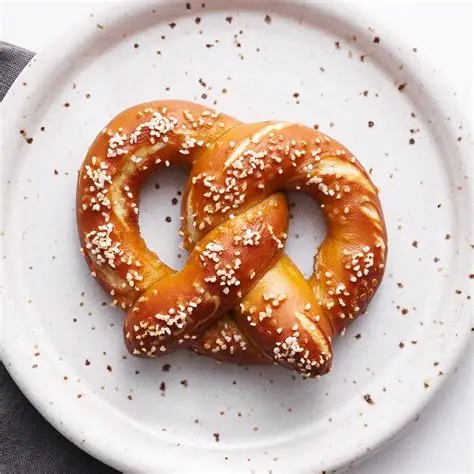
There’s something truly magical about the aroma of warm, freshly baked homemade soft pretzels wafting through your kitchen. Picture this: golden-brown, slightly crispy on the outside but oh-so-soft and chewy on the inside, each bite is a delightful hug for your taste buds. Whether you’re munching on them during a movie night or enjoying them at a backyard barbecue, these pretzels bring smiles all around.
Now, let me take you back to my first attempt at making homemade soft pretzels. It was a rainy Saturday, and I was convinced that I could replicate that iconic snack from my favorite ballpark. Spoiler alert: it didn’t go as planned. Flour flew everywhere, and let’s just say my dog got an unexpected treat! But after some practice (and a few more spilled bowls), I perfected the recipe, and trust me—it’s worth every bit of floury chaos.
Why You'll Love This Recipe
- These homemade soft pretzels are surprisingly easy to prepare, perfect for beginners and seasoned chefs alike.
- The rich flavors combined with the inviting aroma make your kitchen feel like a bakery.
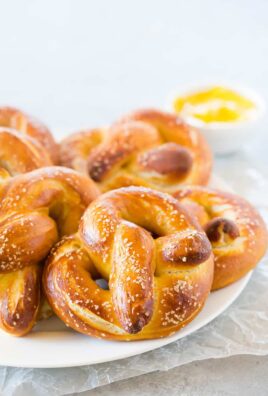
- Their stunning golden-brown appearance will impress anyone lucky enough to snag one.
- Enjoy them plain, with mustard, cheese dip, or even sweet toppings for versatility in flavors.
Ingredients for Homemade Soft Pretzels
Here’s what you’ll need to make this delicious dish:
- All-Purpose Flour: This is the foundation of your dough; choose a high-quality flour for the best texture.
- Warm Water: The water should be comfortably warm to help activate the yeast without killing it.
- Active Dry Yeast: Make sure it’s fresh; it’s what makes your pretzels rise beautifully.
- Granulated Sugar: A touch of sweetness helps balance the flavors and feeds the yeast.
- Salt: Essential for flavor; use coarse salt for sprinkling on top for that classic finish.
- Baking Soda: This gives your pretzels their characteristic color and chewy texture when boiled in the baking soda bath.
- Butter: Melted butter adds richness and flavor, brushing it on right after baking makes them irresistible!
The full ingredients list, including measurements, is provided in the recipe card directly below.
How to Make Homemade Soft Pretzels
Follow these simple steps to prepare this delicious dish:
Step 1: Activate Your Yeast
In a large mixing bowl, combine warm water (about 110°F or 43°C), granulated sugar, and active dry yeast. Stir gently and let it sit for about five minutes until frothy—this means your yeast is alive and ready to rock!
Step 2: Mix Your Dough
Add all-purpose flour and salt to the yeast mixture. Using a wooden spoon or your hands, mix until combined. Once it’s too hard to stir, knead the dough on a floured surface for about five minutes until smooth and elastic.
Step 3: Let It Rise
Place your kneaded dough in a greased bowl, cover it with a damp cloth or plastic wrap, and let it rise in a warm spot for about an hour or until doubled in size. Go grab a snack while you wait!
Step 4: Shape Your Pretzels
Once risen, punch down the dough (it feels great!) and divide it into equal pieces (about eight). Roll each piece into long ropes (about 24 inches), then twist them into classic pretzel shapes—don’t worry if they look wonky; they’ll taste amazing regardless!
Step 5: Prepare Your Baking Soda Bath
While shaping continues, preheat your oven to 450°F (232°C) and bring a large pot of water to boil with baking soda added. Carefully drop each shaped pretzel into this boiling solution for about 30 seconds—this step is crucial as it gives pretzels their unique texture.
Step 6: Bake Away!
Transfer boiled pretzels onto parchment-lined baking sheets. Brush them with melted butter and sprinkle coarse salt over them before popping them into the oven. Bake for about 12-15 minutes until they’re golden brown.
Transfer to plates and serve warm with mustard or cheese dip—it’s hard not to devour these right out of the oven! Enjoy every chewy bite of your homemade soft pretzels while basking in your culinary triumph!
You Must Know
- Making homemade soft pretzels is not just about the taste; it’s about the experience!
- From kneading dough to that glorious golden finish, you’ll find joy in every twist.
- Customize your toppings and enjoy these warm delights fresh out of the oven.
Perfecting the Cooking Process
Start by mixing your dough and letting it rise while preheating your oven. Shape your pretzels and boil them before baking for that classic chewy texture. This sequence guarantees perfectly fluffy, golden-brown pretzels every time.
Add Your Touch
Get creative with your pretzel toppings! Swap out coarse salt for garlic powder, sprinkle on everything bagel seasoning, or even drizzle some chocolate after baking for a sweet treat. The possibilities are endless!
Storing & Reheating
Store leftover pretzels in an airtight container at room temperature for up to two days. To reheat, pop them in the oven for a few minutes until warmed through and crispy again.
Chef's Helpful Tips
- For perfectly chewy pretzels, ensure your dough has enough time to rise properly.
- Don’t skimp on the boiling step; it’s key!
- Finally, experiment with different toppings to find your favorite flavor combinations.
Sometimes I think back to the first time I made homemade soft pretzels—my friends couldn’t stop raving about them! That day, I became the unofficial Pretzel Queen among my circle.
FAQs :
What ingredients do I need for Homemade Soft Pretzels?
To make delicious homemade soft pretzels, you need a few simple ingredients. Start with all-purpose flour, active dry yeast, warm water, sugar, and salt. For the baking soda bath, you’ll require baking soda and water. Additionally, you may want to include coarse sea salt for sprinkling on top before baking. Optionally, melted butter can enhance the flavor after baking. With these ingredients in hand, you’re ready to create your own soft pretzels at home.
How long does it take to make Homemade Soft Pretzels?
Making homemade soft pretzels typically takes about 1.5 to 2 hours from start to finish. This includes around 30 minutes for dough preparation and rising time. Kneading the dough will take about 10 minutes. After shaping the pretzels, you’ll need another 30 minutes for them to rise again before boiling and baking them. Overall, while it requires some time and patience, the process is straightforward and well worth the effort.
Can I freeze Homemade Soft Pretzels?
Yes, you can freeze homemade soft pretzels! Once they cool completely after baking, wrap them tightly in plastic wrap or aluminum foil. Place the wrapped pretzels in a freezer-safe bag or container to prevent freezer burn. They can be stored in the freezer for up to three months. To enjoy them later, simply reheat them in the oven at a low temperature until warmed through for that fresh-baked taste.
What toppings can I use for Homemade Soft Pretzels?
Homemade soft pretzels are versatile when it comes to toppings! The classic choice is coarse sea salt sprinkled on top before baking. However, you can experiment with various options like garlic powder, grated cheese, or everything bagel seasoning for added flavor. You might also consider sweet variations by brushing them with melted butter and sprinkling cinnamon sugar on top after baking. The possibilities are endless!
Conclusion for Homemade Soft Pretzels :
Homemade soft pretzels are a delightful treat that is both fun to make and delicious to eat. With simple ingredients and easy steps, anyone can create these irresistible snacks at home. Remember to give your dough enough time to rise for the best texture. Whether you enjoy them plain or topped with your favorite seasonings, these pretzels are perfect for any occasion. Don’t hesitate to try freezing extra batches so you can indulge anytime!

Homemade Soft Pretzels
- Prep Time: 30 minutes
- Cook Time: 15 minutes
- Total Time: 45 minutes
- Yield: Approximately 8 servings 1x
- Category: Snack
- Method: Baking
- Cuisine: American
Description
Enjoy the irresistible aroma and flavor of homemade soft pretzels, perfectly golden brown and delightfully chewy, ideal for any occasion.
Ingredients
- 4 cups all-purpose flour
- 1 ½ cups warm water (110°F/43°C)
- 2 ¼ tsp active dry yeast (1 packet)
- 1 tbsp granulated sugar
- 1 tbsp salt
- ⅔ cup baking soda (for boiling)
- Coarse salt (for topping)
- 4 tbsp melted butter (for brushing)
Instructions
- Activate Your Yeast: In a large mixing bowl, combine warm water, granulated sugar, and active dry yeast. Stir gently and let sit for about five minutes until frothy.
- Mix Your Dough: Add all-purpose flour and salt to the yeast mixture. Mix until combined, then knead on a floured surface for about five minutes until smooth and elastic.
- Let It Rise: Place the dough in a greased bowl, cover with a damp cloth, and let it rise in a warm spot for about one hour or until doubled in size.
- Shape Your Pretzels: Punch down the risen dough and divide it into eight equal pieces. Roll each piece into long ropes (approximately 24 inches) and twist into classic pretzel shapes.
- Prepare Your Baking Soda Bath: Preheat your oven to 450°F (232°C). In a large pot, bring water to boil and add baking soda. Boil each shaped pretzel for about 30 seconds.
- Bake Away!: Transfer boiled pretzels onto parchment-lined baking sheets. Brush with melted butter and sprinkle with coarse salt before baking for 12-15 minutes or until golden brown.
Nutrition
- Serving Size: 1 pretzel (100g)
- Calories: 270
- Sugar: 1g
- Sodium: 550mg
- Fat: 6g
- Saturated Fat: 3g
- Unsaturated Fat: 3g
- Trans Fat: 0g
- Carbohydrates: 45g
- Fiber: 2g
- Protein: 7g
- Cholesterol: 15mg
Keywords: For variety, consider toppings like garlic powder or everything bagel seasoning. Store leftovers in an airtight container at room temperature for up to two days; reheat in the oven.


Leave a Comment