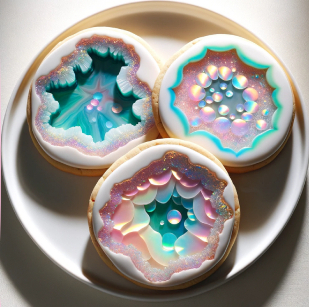
There’s something magical about biting into a cookie that looks like it belongs in a geology lab rather than your kitchen. Geode cookies are not only a feast for the eyes but also a delightful treat for the taste buds. Imagine sinking your teeth into a perfectly baked cookie, only to discover a treasure trove of colorful candy crystals inside that explode with flavor. It’s like Mother Nature herself decided to bake you a sweet surprise!
These geode cookies are perfect for any occasion – birthday parties, family gatherings, or just because you want to impress your friends with your baking prowess. Trust me, when you present these beauties, people will think you’ve unlocked the secret to the universe (or at least the bakery). Now, let’s dive into the crusty exterior and sugary interior of this sensational treat!
Why You'll Love This Recipe
- These geode cookies are surprisingly easy to make and require minimal ingredients.
- Each bite delivers an explosion of flavors with crunchy textures that keep things interesting.
- Their stunning visual appeal makes them perfect for special occasions or as eye-catching gifts.
- You can customize the colors and flavors to match any theme or occasion effortlessly!
Ingredients for Geode Cookies
Here’s what you’ll need to make this delicious dish:
- All-Purpose Flour: This is the foundation of your cookie dough; using a good quality flour ensures perfect texture.
- Baking Soda: A crucial leavening agent that helps cookies expand and rise beautifully.
- Salt: Just a pinch enhances all the flavors in your cookie without making it taste salty.
- Unsalted Butter: Use softened butter for creaminess; it also adds richness to your cookie dough.
- Granulated Sugar: This sweetener gives you that lovely crisp edge while balancing out flavors.
- Brown Sugar: The molasses in brown sugar adds moisture and depth, making your cookies chewy.
- Eggs: They act as binders, giving structure to your cookies while keeping them moist.
- Vanilla Extract: A must-have for that warm, comforting flavor that makes cookies irresistible!
- Candy Crystals (Rock Candy): These colorful jewels create the geode effect inside each cookie; choose various colors for fun!
The full ingredients list, including measurements, is provided in the recipe card directly below.
How to Make Geode Cookies
Follow these simple steps to prepare this delicious dish:
Step 1: Preheat the Oven
First things first: preheat your oven to 350°F (175°C). While it’s warming up, line two baking sheets with parchment paper. Your future self will thank you for avoiding a sticky mess!
Step 2: Whisk Dry Ingredients
In a large bowl, whisk together all-purpose flour, baking soda, and salt until well combined. This step ensures no clumps ruin your cookie experience later on.
Step 3: Cream Butter and Sugars
In another bowl, cream softened unsalted butter with granulated sugar and brown sugar until light and fluffy—like clouds on a sunny day! Add eggs one at a time along with vanilla extract. Mix until everything is wonderfully incorporated.
Step 4: Combine Wet and Dry Ingredients
Gradually mix in the dry ingredients into your wet mixture. Use a spatula or wooden spoon until just combined; over-mixing can lead to tough cookies (and nobody wants that).
Step 5: Add Candy Crystals
Now comes the fun part! Gently fold in those vibrant candy crystals into your dough. Feel free to go wild with colors—life’s too short for boring cookies!
Step 6: Bake
Scoop out spoonfuls of dough onto prepared trays about two inches apart; they’ll spread like gossip at a family reunion! Bake for about 10-12 minutes until edges are golden but centers are still soft. Let them cool on the tray before transferring them to wire racks.
Transfer to plates and watch as everyone swoons over these geode cookies! They’re not just treats; they’re edible masterpieces ready to steal the show at any gathering. Enjoy every colorful bite of this sweet adventure!
You Must Know
- Geode Cookies are not just a treat; they’re a visual delight that brings out the inner artist in you.
- With their colorful, crystalline designs, these cookies will leave your friends and family in awe.
- Plus, they’re a fun project for kids and adults alike!
Perfecting the Cooking Process
First, gather all your ingredients and tools to create an efficient workflow. Start by preparing your dough, chilling it for better handling, then bake the cookies while crafting your stunning sugar crystals.
Add Your Touch
Feel free to experiment with flavors! Swap out vanilla extract for almond or add a dash of lemon zest for a refreshing twist. You can even use different colored sugars to enhance the geode effect!
Storing & Reheating
Store your Geode Cookies in an airtight container at room temperature for up to one week. If you need to reheat them, pop them in a warm oven for about 5 minutes to regain that fresh-baked goodness.
Chef's Helpful Tips
- Use high-quality food coloring to achieve vibrant crystal shades that pop visually.
- Chill the dough long enough to maintain shape during baking for perfect results.
- Avoid overcrowding the baking sheet; give each cookie space to spread beautifully during baking.
There was this time I made Geode Cookies for a friend’s birthday party. To my surprise, they were such a hit that people thought I had taken a class on cookie art! The compliments were endless, and I felt like the cookie Picasso of my kitchen!
FAQs:
What are Geode Cookies?
Geode cookies are fun and visually stunning treats that resemble the beautiful crystals found in geodes. They are typically made from a sugar cookie base, decorated with colorful rock candy or sugar crystals to create that gemstone effect. These cookies not only look impressive but also offer a delightful crunch and sweetness, making them perfect for parties or special occasions. The vibrant colors and unique design make geode cookies an exciting addition to any dessert table.
How do I make Geode Cookies at home?
To make geode cookies at home, start with a simple sugar cookie recipe. Once baked and cooled, use royal icing to attach your chosen rock candy or edible crystals to the edges of the cookies. You can create various designs by mixing different colors of candy. Allow the icing to dry completely before serving. This process is straightforward, and you’ll be amazed at how professional and beautiful your geode cookies will look!
Can I customize my Geode Cookies?
Absolutely! Customization is one of the best parts of making geode cookies. You can choose different colors of rock candy or sugar crystals to match a theme or occasion. Additionally, consider using flavored icing or adding extracts to your cookie dough for a unique twist on flavor. With creativity, you can make each batch of geode cookies uniquely yours while still maintaining their stunning appearance.
Are Geode Cookies suitable for special dietary needs?
Yes, you can adapt geode cookies to meet various dietary needs. For gluten-free options, substitute regular flour with gluten-free flour blends in your cookie dough. If you’re looking for vegan options, replace eggs with flaxseed meal and use plant-based butter. Always check the ingredients in your rock candy or crystal decorations to ensure they align with your dietary requirements. This flexibility allows everyone to enjoy these eye-catching treats.
Conclusion for Geode Cookies:
In summary, geode cookies are a beautiful and delicious treat that anyone can enjoy making at home. Their stunning appearance makes them perfect for various occasions, while customization options allow for creativity in flavors and designs. Whether you are baking for a party or simply indulging yourself, these cookies bring joy and delight. Try out this delightful recipe today and impress friends and family with your gorgeous geode cookies!

Geode Cookies
- Prep Time: 20 minutes
- Cook Time: 12 minutes
- Total Time: 32 minutes
- Yield: Approximately 24 cookies 1x
- Category: Dessert
- Method: Baking
- Cuisine: American
Description
Indulge in stunning geode cookies that combine vibrant candy crystals and a soft, chewy texture—perfect for any celebration or a delightful treat to impress your friends!
Ingredients
- 2 ½ cups all-purpose flour
- 1 tsp baking soda
- ½ tsp salt
- 1 cup unsalted butter, softened
- ¾ cup granulated sugar
- ¾ cup brown sugar, packed
- 2 large eggs
- 2 tsp vanilla extract
- 1 cup colorful candy crystals (rock candy)
Instructions
- Preheat the oven to 350°F (175°C) and line two baking sheets with parchment paper.
- In a large bowl, whisk together all-purpose flour, baking soda, and salt until well combined.
- In another bowl, cream the softened unsalted butter with granulated sugar and brown sugar until light and fluffy. Add eggs one at a time along with vanilla extract, mixing thoroughly.
- Gradually mix the dry ingredients into the wet mixture using a spatula until just combined.
- Gently fold in the colorful candy crystals into the dough.
- Scoop spoonfuls of dough onto prepared trays about two inches apart. Bake for about 10-12 minutes until edges are golden but centers are still soft. Let cool on the tray before transferring them to wire racks.
Nutrition
- Serving Size: 1 cookie (40g)
- Calories: 180
- Sugar: 12g
- Sodium: 80mg
- Fat: 8g
- Saturated Fat: 5g
- Unsaturated Fat: 3g
- Trans Fat: 0g
- Carbohydrates: 25g
- Fiber: <1g
- Protein: 2g
- Cholesterol: 30mg
Keywords: Chill the dough for easier handling before baking. Experiment with different flavors by adding extracts like almond or citrus zest. Ensure candies used for decoration are compatible with dietary needs if necessary.

Leave a Comment